

Introduction:
When it comes to professional printing, ensuring that your designs are perfectly aligned and well-executed is crucial. Two essential elements that play a vital role in achieving impeccable printed materials are bleed and crop marks. In this blog, we’ll delve into the concept of bleed and crop marks, their significance in the printing process, and how to use them effectively to enhance the quality of your prints.
What is Bleed?
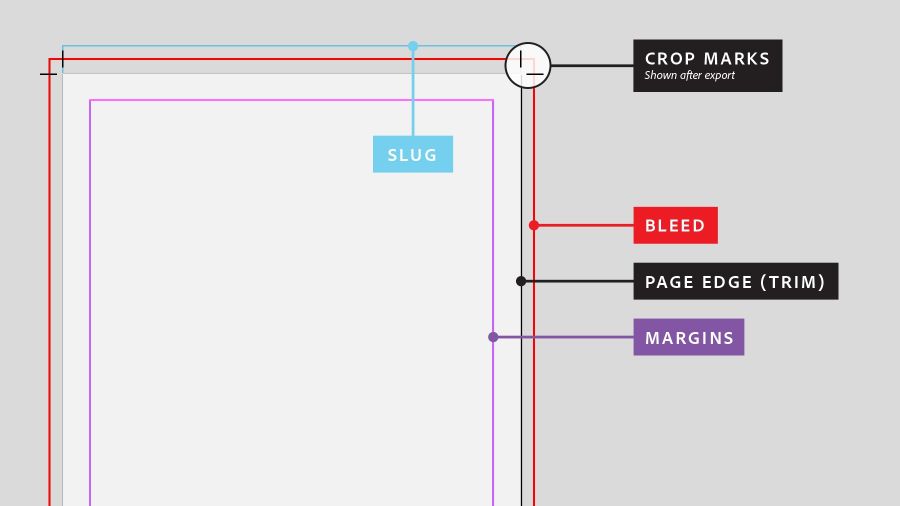
Bleed refers to the area of a design that extends beyond the final trim size. When a design contains elements such as images, background colors, or patterns that extend to the edge of the paper, bleed ensures that there are no white margins or unwanted borders after trimming. It provides a safety margin, compensating for minor misalignments during the printing and trimming process.
Why is Bleed Important?
Achieving Professional Results: Bleed ensures that your printed materials appear professional and polished. It prevents any unintended white space or borders around the edges of your design, creating a seamless appearance.
Avoiding Misalignment: During the trimming process, minor variations may occur. Bleed allows for these discrepancies by providing extra space beyond the final trim size. This ensures that important design elements are not accidentally trimmed off.
Flexibility in Layout: Incorporating bleed in your designs gives you more freedom to experiment with different layouts and graphic elements. It allows you to extend the design to the edge of the page, creating visually appealing and engaging printed materials.
What are Crop Marks?
Crop marks, also known as trim marks or registration marks, are lines placed on the corners of a design to indicate where the printed piece should be trimmed. They act as guides for the printer and the person responsible for trimming, ensuring accuracy in the final product.
The primary purpose of crop marks is to indicate the precise area where the design should be trimmed, including both the bleed area and the final trim size. These marks help avoid any confusion during the cutting process and ensure that the final printed material matches the intended dimensions.
How to Use Bleed and Crop Marks:
Setting Up Bleed: Before starting your design, determine the required bleed specifications provided by your printing service provider. Typically, a bleed of 0.125 to 0.25 inches (3-6 mm) is recommended. Extend the background, images, or patterns beyond the trim size, making sure they reach the bleed area.
Adding Crop Marks: Once your design is complete, it’s time to add crop marks. In professional design software like Adobe InDesign or Illustrator, you can easily generate crop marks automatically. Alternatively, you can manually create them by drawing short lines (usually 0.125 inches or 3 mm long) perpendicular to the edges of the design, at each corner of the trim area.
Exporting the File: When exporting your design for printing, ensure that you include both the bleed area and crop marks. Save the file in a print-ready format such as PDF, making sure that the crop marks are visible but not interfering with the overall design.
Conclusion:
Understanding the significance of bleed and crop marks is essential for producing high-quality printed materials. Bleed allows your designs to extend beyond the trim size, ensuring a professional and seamless appearance, while crop marks act as guides for accurate trimming. By incorporating bleed and crop marks correctly, you can enhance the overall visual impact of your printed materials and ensure that your designs are executed precisely as intended. So, next time you’re preparing a design for print, remember to embrace bleed and crop marks to achieve outstanding results.


